How to update your old pendant lighting using only a lampshade. I’ll show you how you can easily turn an outdated pendant into something more modern without spending a ton of money.
[mailerlite_form form_id=8]
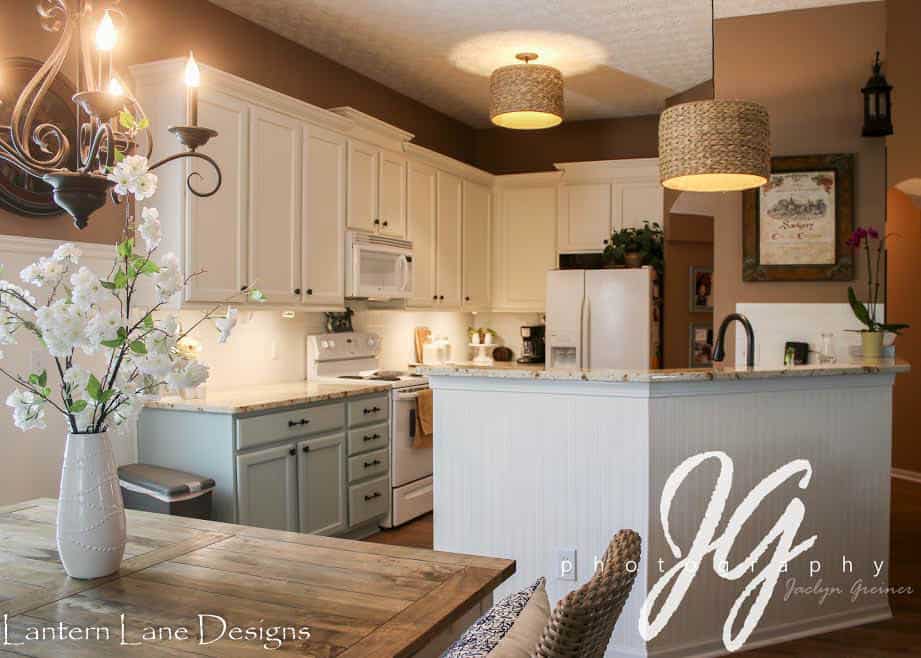
Let’s talk about my new (to me) kitchen for a second. When we moved into this house it looked something like this.

Excuse the everyday mess. This is the only picture I have of our kitchen before I got my hands on it and shortly after we moved in.
It’s a very nice kitchen…you will never hear me complain about it (well, maybe just a few times). I knew I was going to be making a few adjustments to this kitchen. It’s not 100% my style but I knew I could make it my own with a few projects. In an ideal world my cabinets would be white instead of a glazed cream but anytime the thought of painting them crosses my mind I get nauseous.
I’ve painted cabinets before and it wasn’t awful. It’s like childbirth…not sure I want to go through with it again. So instead I figured I could just inject some white and bright into the kitchen other ways. Obviously painting the walls was my first task. And thanks to my son who “accidentally” flooded the upstairs bathroom and ruined our ceilings in the kitchen, painting of the kitchen was expedited. We will refer to him from now on as the “Wet Bandit”.
Also thanks to the 8 year old Wet Bandit I had to remove the pot rack that was hung above the island so I was able to paint the ceiling. I was not sad about the removal of the pot rack. I was never going to use it and it seemed to clutter up the kitchen. Once that was gone and the kitchen walls were freshly painted (Behr Silver Drop~my favorite color) I was determined to update the pendants over my island.
Again, there was nothing wrong with them. They just weren’t 100% my taste. I was willing to work with them but once that pot rack was down they looked so pathetic up there. I knew I wanted something with more umph. Since I am the most indecisive person on this side of town I sat on this idea for 9 months.
I originally thought I was going to get these. And let me tell you, I saw them up close and personal at the store and they are gorgeous and for the price I was amazed. But (always a but) they were huge. Two of them over my island would have been too much lantern in your face.
I had these in my old house and as much as I loved them I wasn’t digging the rope cord for this space.
I loved the wicker shades and the price is pretty great. But I wasn’t able to pull the trigger. Something about taking down a pendant with a metal cord and replacing it with one with a rope cord wasn’t doing it for me.
I’ve been slowly crushing on cone pendants. They are little bit more modern but oh so pretty.
When my little mind is indecisive I immediately go into DIY mode. And this DIY project went pretty well. This was supposed to be a temporary fix until I can get my mind to make a decision BUT I am so loving the results that this might be permanent.
Let me first start out by saying that this project and the way I did it will only work for you if you can remove your shade from your original pendant and you are left with this:

(This post contains affiliate links for your convenience)
You’ll see why in a second…hang tight. And you’ll also need a Dremel for this project. I promise you it’s not as scary as it sounds. Do not fear the Dremel. It is so easy to use and made this project a breeze. Purchasing a Dremel is so much cheaper than purchasing two new pendants and nagging my husband to install them (or waiting patiently for my dad to help).
I found these lamp shades at Lowes for $12 and I loved their cone like shape. These lamp shades were a close second. The gold lining is so pretty. Whatever lamp shade you choose should have this as the fitting. I’m sure there is a professional word for this fitting but I have no clue what it is.
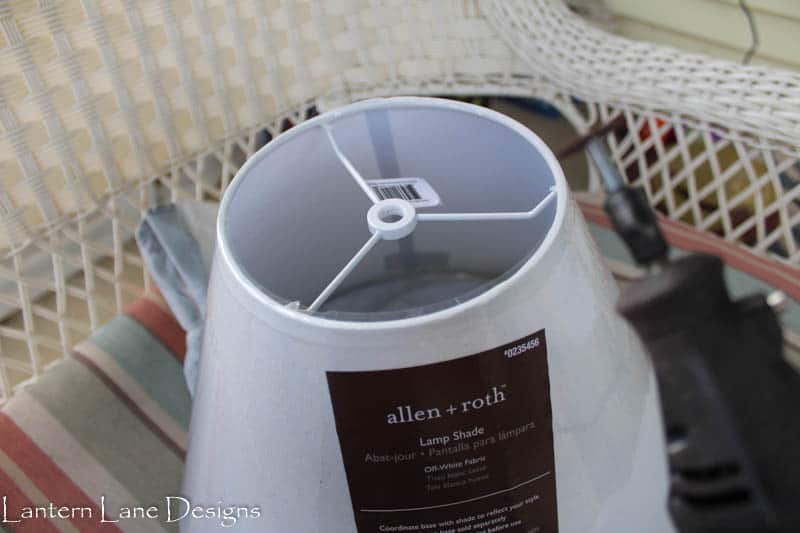
If you bought a new lamp shade for this project I highly recommend keeping the plastic wrap on (if it has one) until you are done Dremeling (that’s totally a word). It’ll keep your lamp shade protected from the dust. You’ll want to use the disk attachment on your Dremel (a few disks will be included in your kit). You are going to cut out the middle circle of the lamp shade fitting.
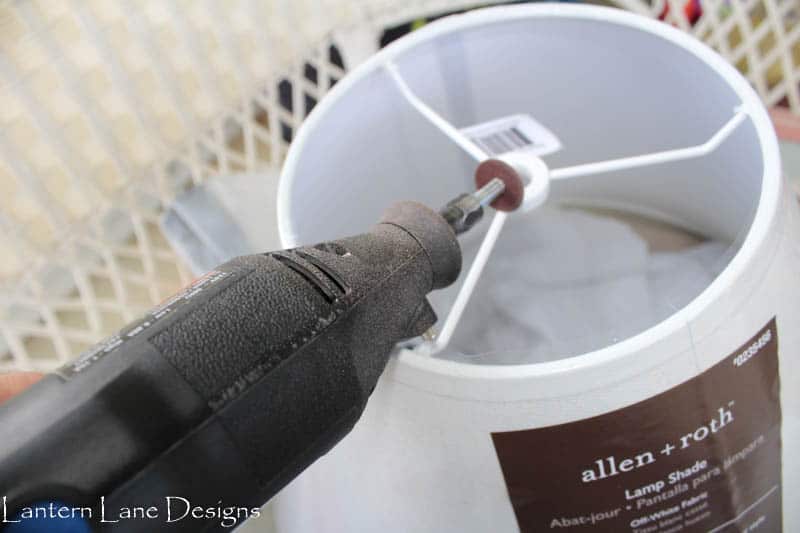
I highly recommend you do this part outside and wear protective glasses. Do this to all three prongs (or whatever they are called). And you’ll be left with this:

Your lamp shade has officially been de-circled. You can end it right here or take it a step further like I did…because I can never leave well enough alone. I painted a black trim around the bottom and top of my lamp shade. I originally tried gluing ribbon and that was bad, very bad. The cone shape made it difficult to get a smooth trim with the ribbon. I had left over paint from when I painted my shutters and just used that. You can also use fabric paint.
I used the trim on the shade as my guide and taped along the trim.
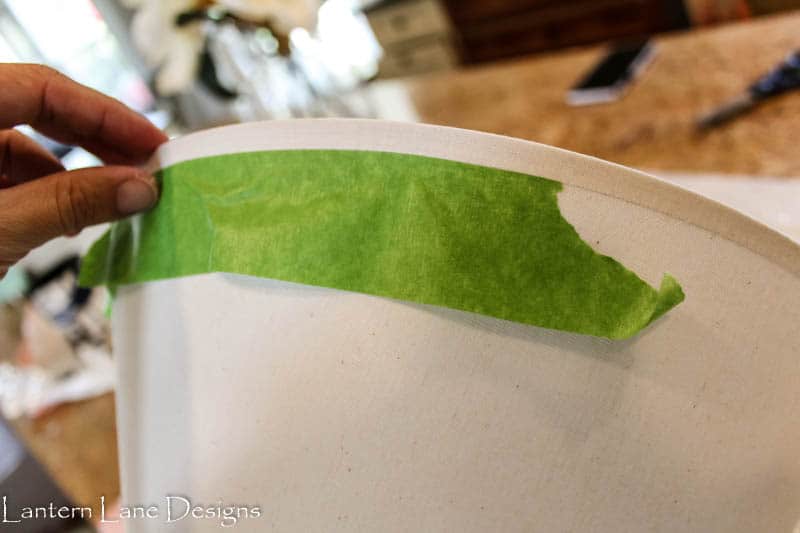
The top of the lamp shade was a little tricky since it was extra cone-y so I had to get a little creative with the tape.
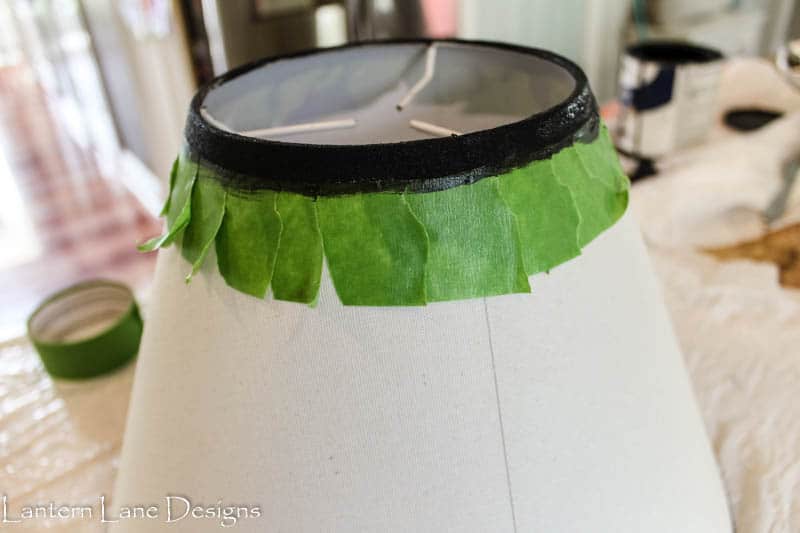
And I very very very carefully painted the trim. I mean, I was border line hyperventilating doing this I was so nervous I was going to mess it up. But it was a success. I also painted the trim on the inside of the shade since you will see it once it’s hung.
After everything was dry I slipped the lamp shade up from the bottom of the pendant and had the three prongs sit on top of the pendant like this:

It’s nothing fancy. If you need to you can add electrical tape or wire to help keep things in place. So far mine have stayed just as is. And that’s it. Twelve bucks (times 2) later and I have myself new pendants.

If you want to save this for later, you can pin it here:

How to update your old pendant lights using only a lampshade. I’ll show you how you can easily turn an outdated pendant into something more modern without spending a ton of money.
Follow Me!
Pinterest//Instagram//FaceBook
[mailerlite_form form_id=4]
You might also like!


