Simple and easy steps on how to make your Christmas garland look fuller and simple Christmas mantel decorating ideas
I struggle frequently with my mantel. And it’s no exception when I am decorating it for Christmas. Someone (I forget who and I can be making this up) once told me that if you are truly content with your space you won’t change it. I guess I have issues with my whole house then.
Just kidding.
But my mantel-definitely. I originally had planned on keeping my blue prints up on my mantel for Christmas but I wasn’t feeling it. I tried, I really did. I had it all decorated for Christmas with stockings and all. I even thought I was officially done decorating my mantel. I was content with it for all of 24 hours
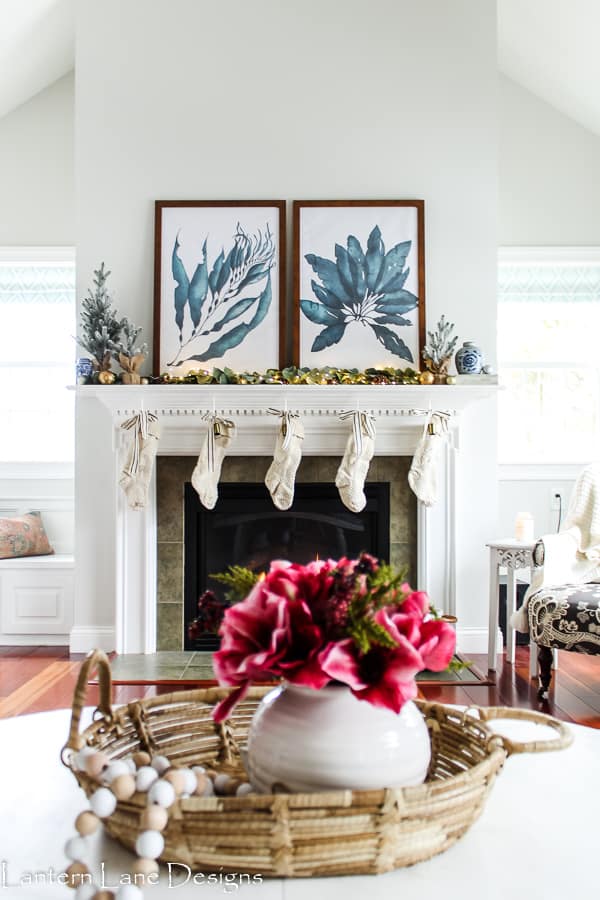
And then I wasn’t content with it anymore and completely redecorated it…a few more times. Don’t get me wrong, I liked the first mantel I decorated. But I had the urge to think outside the box and go a little bit more dramatic this year on the mantel. My first mantel was pretty predictable for me.
I always wanted full garland hanging down from my mantel. But I secretly despise garland. I really do. It’s such a pain to work with and the full ones are so heavy they just fall off my mantel. Not to mention, once you get the garland up on your mantel (and it actually stays) you don’t have room for anything else.
But that thick, full garland on a mantel with little twinkling lights is so pretty.
After lots of trial and error and lots of four letter words, I got my full garland up on my mantel. And I have been holding my breath ever since hoping it doesn’t fall off.
Let me save you from using choice words and I’ll show you how I did it.
I used 2 different garlands and some eucalyptus stems from IKEA and Amazon
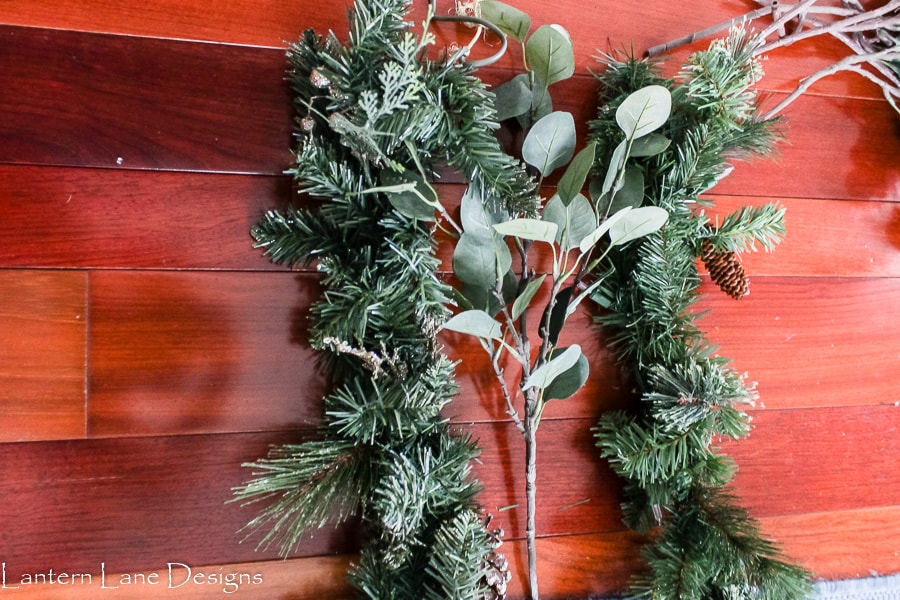
I ran out of my IKEA eucalyptus and wasn’t in the mood to drive to IKEA for just eucalyptus so I ordered these from Amazon. They aren’t as nice as the ones from IKEA but they did the job.
The first garland I used was inexpensive prelit garland I found at Home Depot and the other garland I have had for years. It is fuller and a little nicer than the prelit garland.
A few things first, I can live with an asymmetrical mantel. I know others cannot. I did my mantel this way for a few reasons. My mantel is pretty long and we were putting our tree up in the corner where the chair is. I’m married to Clark Griswold so I knew we would get the biggest and fattest tree that would take up the whole living room and end up covering half the mantel. And it does. I’ll share a picture soon.
My husband is one of those people that needs symmetry, so it’s also been fun watching him squirm when he looks at the mantel.
I tried to assemble this garland on the ground first and then put it up on the mantel. It didn’t work in my favor. That’s when most of the four letter words came out. So I decided to put it together on the mantel.
And because, at this point, I was considering throwing the garland in the fire, I didn’t take too many pictures of my steps but it’s actually pretty straight forward and surprisingly easy.
I first put the prelit garland from Home Depot on my mantel, letting it hang down off the mantel. I then added my fuller garland right next to the prelit garland, also letting it hang down. Pretty simple, right?
At this point, step back and take note where you want to beef your garland up more. I knew I wanted mine to be thicker on the left side of the mantel. I simply laid my IKEA eucalyptus stems on top of the two garlands in some spots and other spots I tucked it in. I had to play around with it a few times.

Stockings//Ribbon/Bells (found those in the craft section at Hobby Lobby)
For the garland that was hanging down the mantel, I cut up some of my Amazon eucalyptus stems and tucked in little pieces of the stems throughout the garland.

Now, the corner of the garland, where the garland started to hang off the mantel was tricky. I wanted that part to be extra full. I grabbed some extra garland I have had from another project (that I completely botched last summer). I cut off a few large pieces of the garland and tucked those in the corner. I liked this garland because it was droopy and I wanted these pieces to droop down.

And that was it. It was just a matter of trial and error and stepping back 150 times to see what needs adjusted.
As you can see too, the blue prints have been relocated temporarily (maybe permanently).
I love this mirror I recently purchased and knew it would look so good on a mantel. I told myself I would just quickly place it on my mantel for 30 seconds just to see what it would look like. For sure, I thought I’d hate the reflection of the fan (and part of a wall in our family room that hasn’t been repainted) . But, I was wrong. I loved it up there, fan reflection and all.
I threw a wreath and some flameless candles to the mantel and I was done. I also added in some extra twinkling lights because you can never have too much twinkle on your mantel.

I’m so glad I went for it and did something completely different this year. It’s driving my husband nuts, but don’t worry he brought home a 10 foot tree that is now covering the mantel so we are even.
If you want to save this for later, you can pin it here:
If you are curious:
- Stockings
- Ribbon
- Bells on Stockings (found them in the craft section of Hobby Lobby)
- Flameless Candles
- Twinkling lights
- Bells on wreath (also found at Hobby Lobby in the Christmas area)
- Buffalo Check pillow (see how I made it here)
- Mirror
- Wall color is Silver Drop by Behr
Come hang out with me on Facebook and Instagram! Come Pin with me on Pinterest!
You Might Also Like!

Farmhouse Christmas Decor Ideas

Christmas Decor Ideas For Your Front Porch

Affordable Christmas Decor Ideas