DIY bathroom makeover on a budget and a DIY vanity using our existing vanity (how we went from one sink to two)
I should be ashamed of myself for taking this long to write this blog post. If you follow me at all over here on this side of the internet, then you know I wasn’t too happy last year when we were getting new counters.
I call it Karma. My husband just wanted to get a new counter for our kid’s bathroom but somehow I managed to weasel new counters in our kitchen too. And that is when things got ugly.
I’ll save you from the boring details. This is just your fair warning that I turned what should have been an easy project into a nightmare.
But it wasn’t the bathroom’s fault. It was my fault.
Our kids’ bathroom started off looking like this when we moved in. The previous owners built our house and did not do a whole lot to the house since they built it.

(This post contains affiliate links. You can see my full disclosure policy here)
The bathroom had seen better days. It was fine and functional but definitely needed a little makeover.
Our biggest motivator for this bathroom makeover was to take the counter from one sink to two sinks.
With three kids, we really wanted two sinks. And we really needed two sinks.
Originally I was very naive and thought I could just drive to Home Depot and grab one of their “off the shelf” double sink counters and call it a day.
Nope, I was wrong, very wrong. The dimensions of our current bathroom vanity were odd. Everything in our house is odd. I wasn’t surprised that I would have to find a custom counter.
I was not interested either in ripping out the existing vanity and replacing it because I knew that could lead to all kinds of problems that I had no interest in addressing.
And I was not interested in replacing our ceramic tile floors, which would likely have to happen if I ripped out the current vanity. A new tile floor was not part of this bathroom design.
I wanted this makeover to get done with the least amount of work and problems. And I wanted to keep the labor costs down by doing as much of this that I could myself. I also did not want a full bathroom remodel.
I knew the best way to get the design I wanted for the best price was to simply switch out the counter and make some cosmetic changes. So that is what I did.
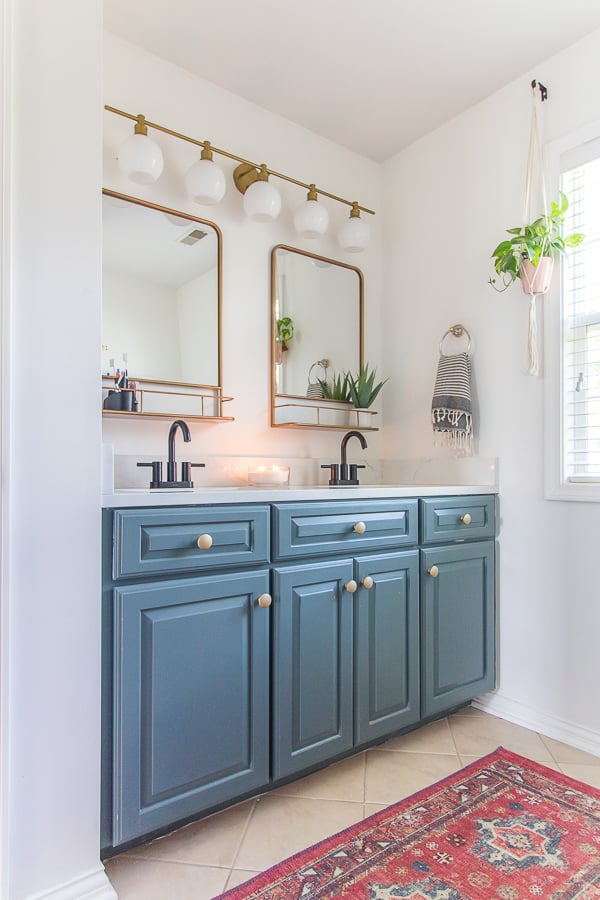
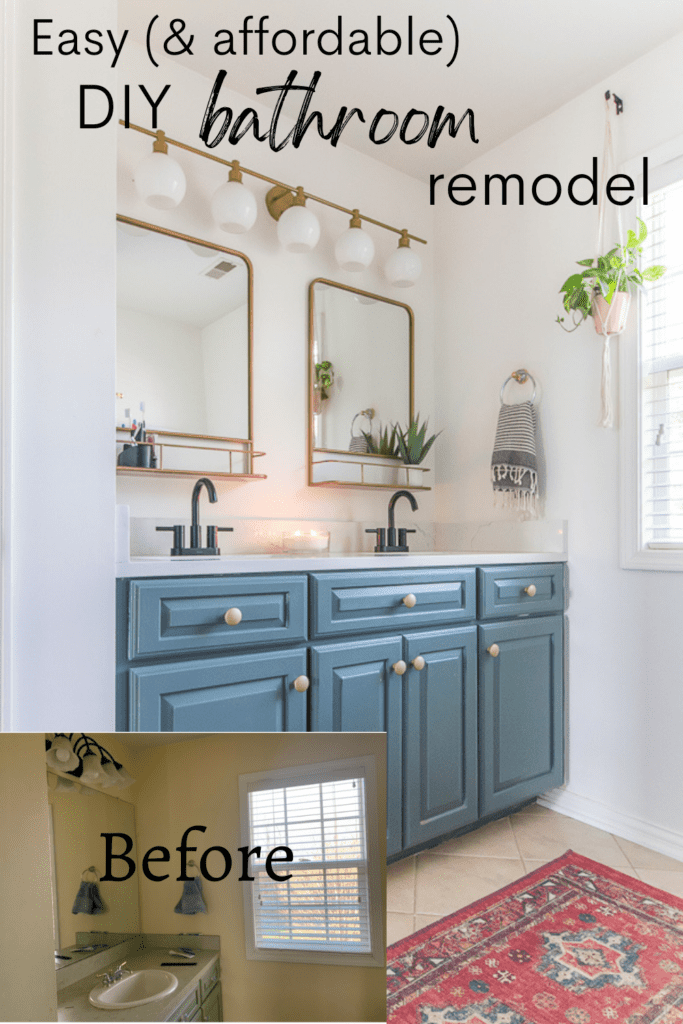
This is what the bathroom looks like after all of my hard work
Do we need to see the before one more time?
Yes, the blood, sweat and tears were worth it. Ok there was no blood and almost tears but lots of sweat
Let’s just do this blog posts in steps because this bathroom even confused me. This wasn’t one of those easy DIY projects…for me. It could be for you.
Step 1: Convince your husband you need new kitchen counters (kidding)
Step 1 (for real this time): Hire a reliable (and trustworthy) plumber for the plumbing work (don’t attempt this yourself)
And make sure you do this step first…I did not
Like I said, the whole reason for this bathroom renovation was to get this bathroom from one sink to two.
I wanted nothing to do with ripping out the existing vanity and having to purchase a new vanity. So I had to make sure we were able to take the plumbing from one sink to two without having to rip out the vanity to get into the wall.
I had two plumbers come to give me quotes and to get their opinions.
I did not like the one plumbers opinion or quote…I was not a fan of that guy. He was confirming that all of my fears were coming true. I thought I was doomed.
The other plumber I had come out the next day was my hero and I wanted to add him to our Christmas card this year.
He confirmed that we were able to do what I wanted without removing the vanity. And his quote was reasonable.
Always, always, always get a second and third opinion.
As a total disclaimer I had already ordered the counters for the bathroom and was sweating bullets since I had no idea if my vision was even possible.
I had to make this work. I should have made this the first thing I did.
And these were the only professional contractors I wanted to hire.
The plumber returned after the counters were installed to work on the plumbing. I really have no idea what the plumber did. I stayed out of the way with my fingers crossed the whole time. It took him a few hours but once I heard running water coming out of two faucets I did a cartwheel.
Step 2: Purchase new counters
Oh the hunt for new counters was the most frustrating time for me. I spent many days here
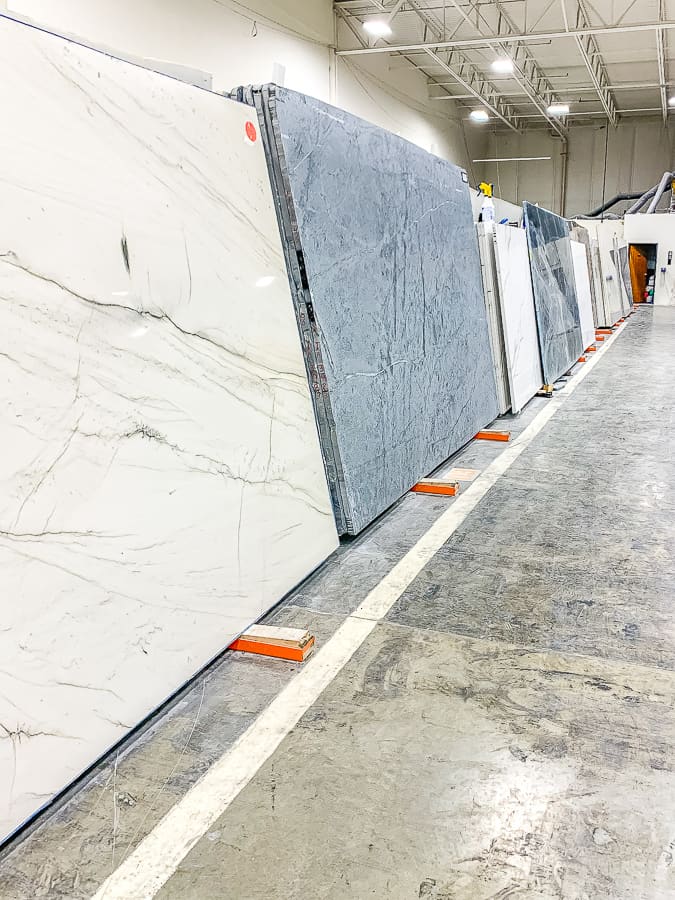
In my husband’s ideal world I would have just gone to a stone yard and found myself a remnant piece and called it a day.
And while I did think about just doing that for a hot second (as this is a great way to save some moolah) I really wanted (and needed in my opinion) new kitchen counters.
I originally had picked out quartzite for our kitchen and bathroom. That was a disaster. You can see my quartzite countertop dilemma here.
I then ripped out the quartzite and replaced the bathroom counters with quartz.
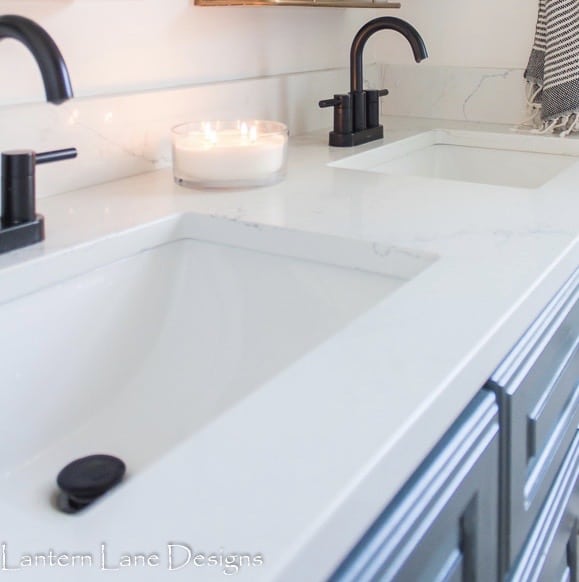
(More on my white quartz here)
I did go to Home Depot to get a quote on getting a custom counter from them as well. However since the amount of counter I needed was under their square footage minimum I only had a few options. I think my options were quartz and granite. Laminate was not an option
Again, I could have gone down that road but I wanted to make things more interesting and stressful.
After the counters were purchased I had some work to do in the bathroom before the new counters were installed.
I removed the giant builder grade mirror off the wall. I was very fortunate that our mirror was only attached with screws and came out very easily.
We also removed the old laminate counters ourselves. Those popped out like ice cubes. I think they were ready to come out.
DIY Vanity
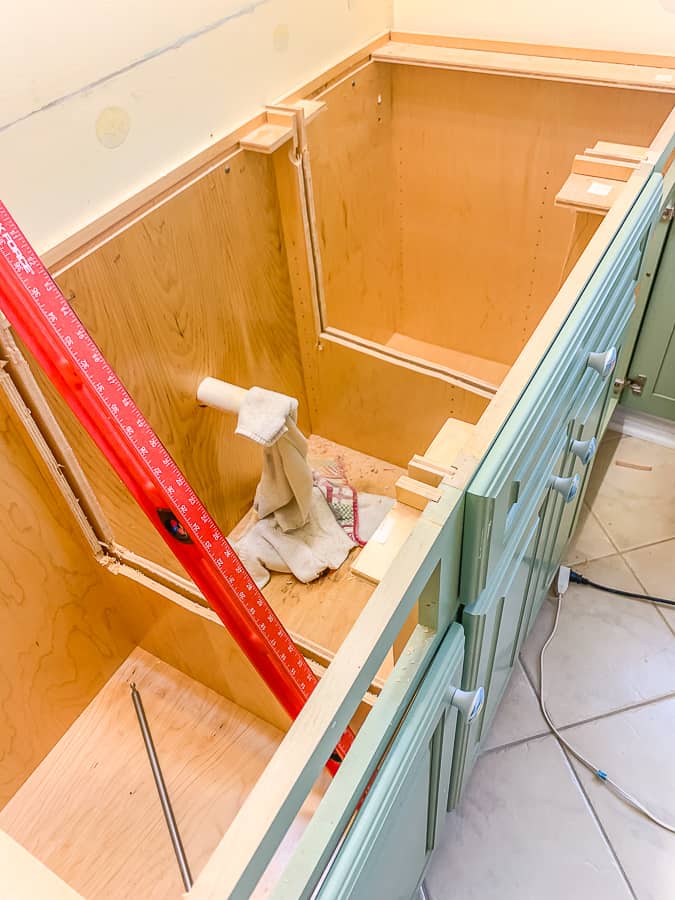
Step 3 : Cut out your current vanity.
This was another part of this project that got me nervous. We had to make room for the new plumbing that was going to get installed and we had to make room for the new sinks.
The current vanity only had one large cut out for the one sink.
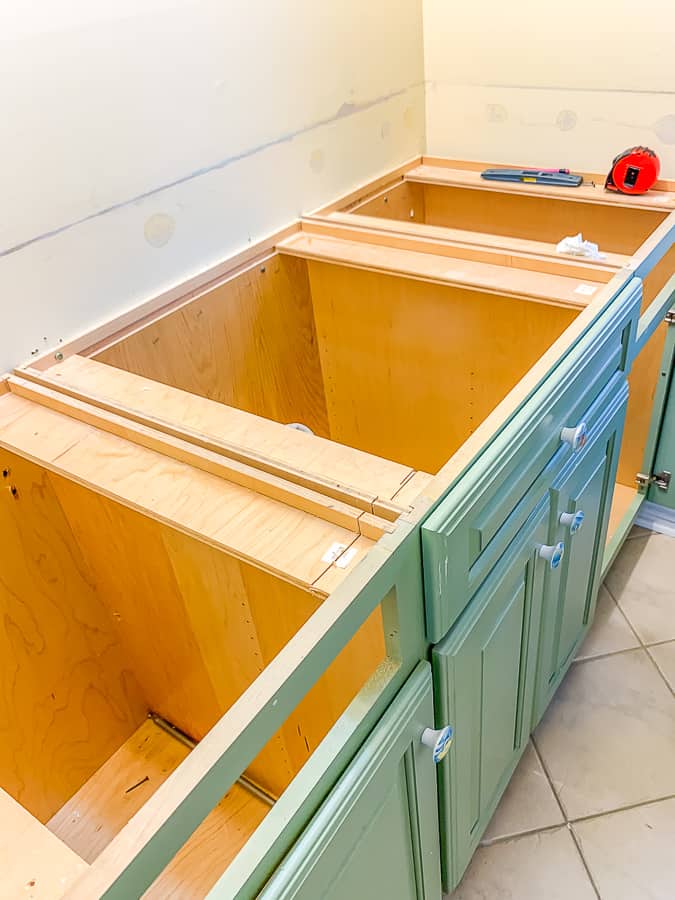
We needed to make some adjustments.
Thank God for my dad that is all I have to say. I’d still be trying to cut out the old vanity. It was not hard but it will require specific power tools.
We cut out as much as we possibly could.
Step 4: Paint your vanity
This part is obviously optional. I wanted to keep the vanity base intact but I also wasn’t a fan of the green vanity…so off I went to the paint store.
I did a whole blog post on how to paint cabinets. In a nutshell, I used Benjamin Moore’s advanced line of paint. I love this paint for cabinets. It goes on so smooth, is self leveling and dries like a rock.
I painted our kitchen cabinets in our old house with this same paint and the cabinets were holding up great.
I painted the cabinets by hand with a foam roller and brush and just went slow and steady. It is definitely not a hard process but it can be time consuming since you need to wait quite a few hours in between coats of paint.
But it is well worth it.
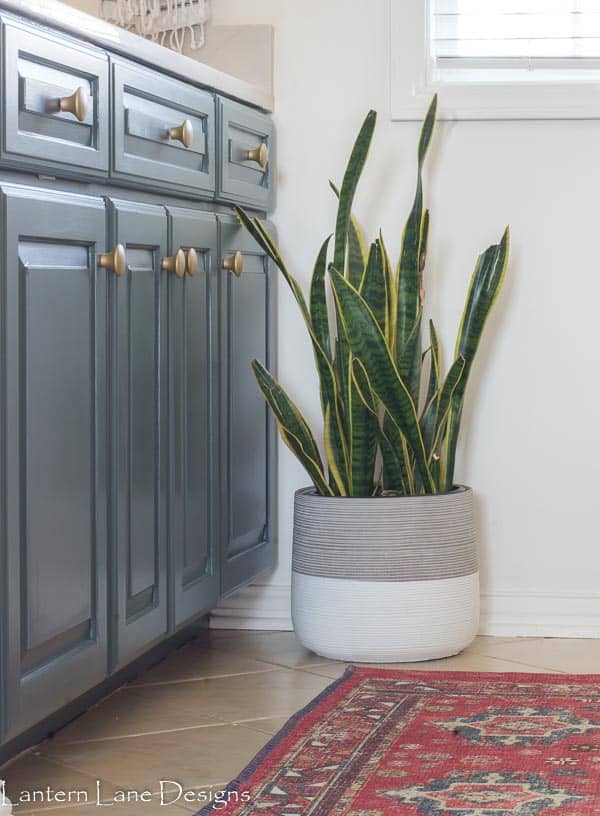
The paint I used for the vanity is Benjamin Moore Knoxville Gray and it is such a great color.
I also just spray painted the original hardware gold and called it a day. No need to buy all new knobs when there is spray paint.
Step 5: Paint your walls
Again this is optional but once the new counters are in I’d suggest painting your walls before you put your room back together with accessories.
I painted the walls Simply White by Benjamin Moore. I wanted the vanity to pop against the walls so white they went.
Do I recommend a white paint in a kids’ bathroom? Likely not, but I have half of a can of paint left over for touch ups.
Step 6: Purchase new accessories
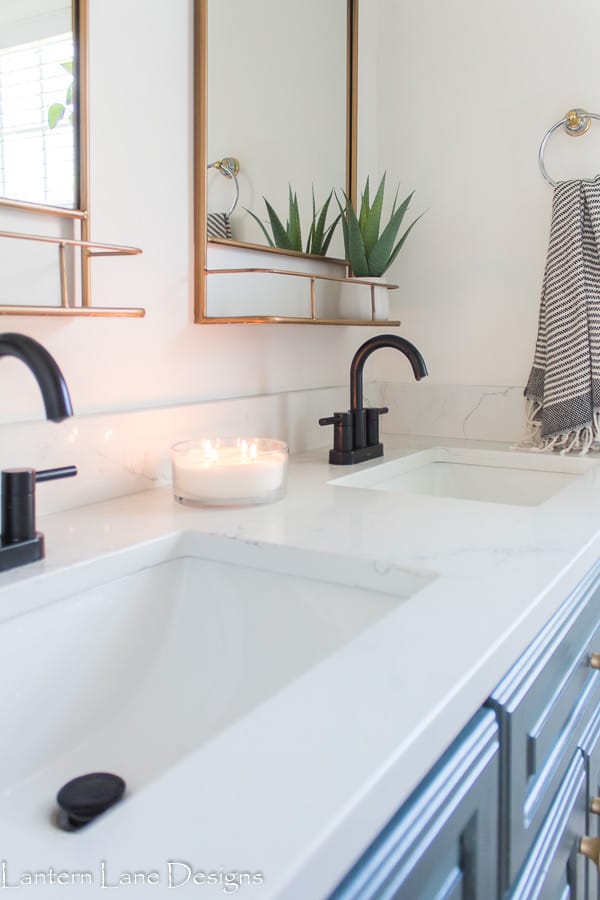
This was the fun part. I needed new faucets, new mirrors, a new light fixture, new shower curtain and a new rug (for more pops of color)

(Click on image to shop)

I really wanted to get two mirrors in this bathroom instead of one big mirror. I was worried how two mirrors would look with one light fixture and I will have to say I am happy with them.
I love these mirrors for the little bit of storage they give us. We have less counter space now with two sinks so my kids have found a way to shove as much as they can onto the shelves in the mirror.
(The bathroom has never been this clean since I took these pictures if you were wondering)
The light fixture was a great find. I wanted a long light fixture to cover both mirrors and this one was perfect. AND, I installed the light all myself…with my dad’s supervision of course. I am not that good.
It is the only electrical work I will ever do. I also accidentally ordered the wrong color light fixture so there is that.
I thought the finish was going to be matte black. I guess my fat fingers hit gold instead. I really do like the gold finish though but I was afraid the finish would clash with mirrors.
I think it worked out in the end though.
I also like the frosted globes. I can’t handle the maintenance of clear globes.
I am not a matchy matchy decorator so I went with matte black faucets. I did not put too much thought into these faucets. I actually purchased the faucets before the counters were even installed. I went to Lowes and just did eeny meeny miney moe
Sometimes that is how you just need to decorate.
While I did not want to replace the tile in the bathroom, I can’t say I love that tile. I wanted to bring in more color into the room too. I found this rug at Target and it’s actually a kitchen runner but it works perfectly for the our bathroom.
It also has non slid backing so it does not have a mind of it’s own and stays put.
I did get new hand towels and a new shower curtain too. I love these hand towels from Olive and Linen.
I wanted to get a plant in that bathroom too and with limited counter space I added a hanging plant with the help of curtain bracket to the wall. I really wasn’t interested in adding a hole to the ceiling. The wall worked fine.
We also did end up getting a new toilet but I will spare you a picture of a toilet that gets used my three kids (ha!)
I would love to one day (maybe) get a new shower or tub surround in their bathroom but for now the current shower is in good shape.
This entire project didn’t cost an arm and a leg and it feels like we now have a completely new bathroom. The counters were probably the biggest expense followed by the labor cost for the plumbing.
But it was nothing compared to what could have been if we ripped everything out of that bathroom.
The lengths I went to to keep the current vanity in tact!
Click on any image to shop:
If you want to save this for later, you can pin it here:
DIY Bathroom Makeover (and how we took our bathroom counter from one sink to two)
You might also like

White Quartz Countertops (Pros and Cons)
