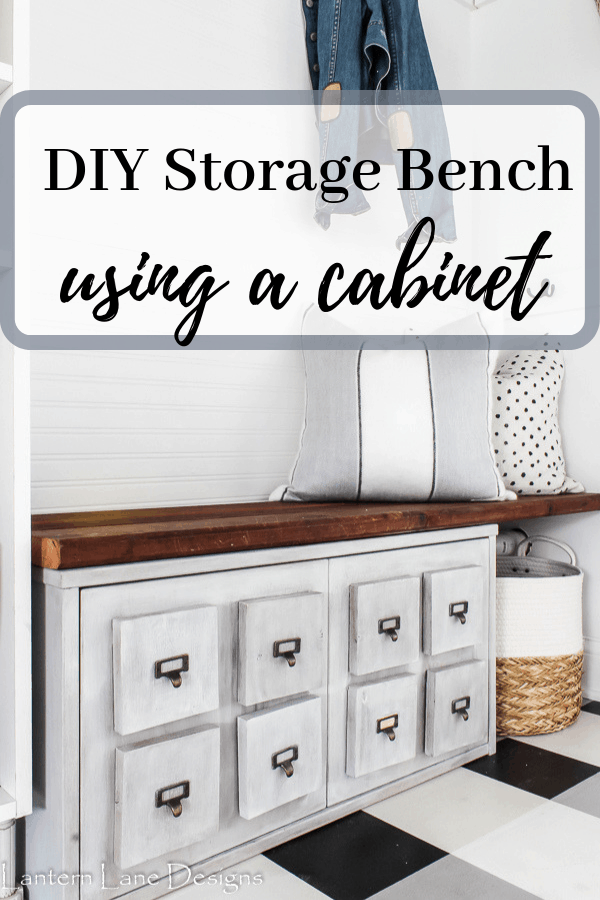
DIY Storage Bench Using An Old Cabinet
I really had no idea what to name this post… DIY storage bench or DIY faux card catalog or DIY faux card catalog storage bench (say that 4 times). I guess I took two of my ideas and smooshed them into one project because a card catalog isn’t found too often in a mudroom but it’s where you’ll find mine.
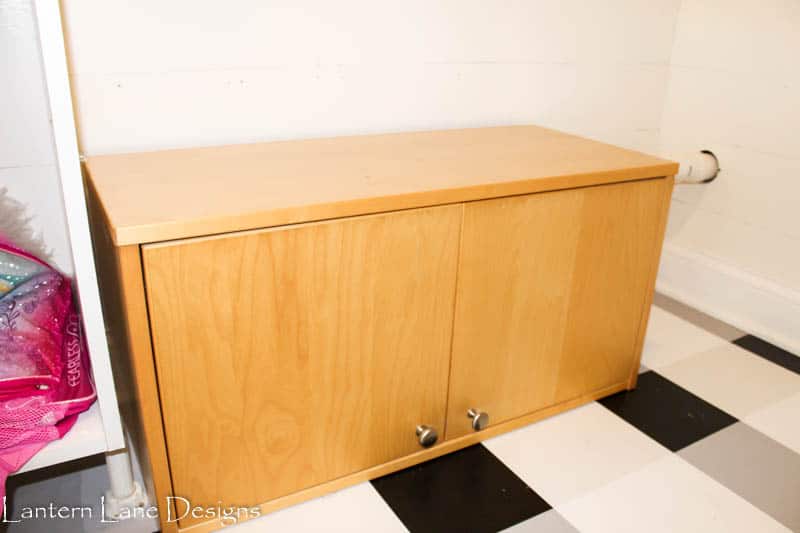
I was just really trying to jazz up the front of the boring doors on an old cabinet I found.
I loved this project. It might look intimating but honestly it was a quick and easy one. It’s projects like these that warm my impatient heart. I found 99.8% of the stuff for this project in our barn that was left over from the previous owner. The idea I had in my mind and the scraps I found just started clicking together perfectly. I love when that happens.
Let’s back up. I previously talked about my love/hate relationship with this mudroom when I painted the floor in here. I hated that pipe coming out of the wall (among the other things that are bothering me about this room, i.e. the old washer and dryer hook up). I couldn’t put a bench flush up against the wall with that dang pipe sticking out as it is. This corner is an eye sore, I’m just warning you.

I did attempt to anchor a floating bench to the wall as Plan A and it was failing miserably so I immediately had to start a Plan B. I love when Plan B turns out better than Plan A.
When we first moved in the previous owner had left these cabinets hung up in the office/laundry room.
I took them down and had them in the barn thinking I’d install them in there and just use them as extra storage. Fast forward to a few weeks ago my husband insisted I climb up our scary ladder in the barn and wander around in the barn attic space.
He knows my love of random pieces of old wood. Among the scrap pieces of wood (and probably mice and spiders) were just a few boards of what looked like old deck boards. Quite honestly, I have no idea what they were but they were in perfect condition and I knew I had to do something with them.
And the fact that three of those deck boards (let’s call them that for now) combined was the same exact depth of that cabinet I had lying around in the barn was (in my world) considered magic. I had originally wanted to make a floating bench with these boards.
By the way, after you read this long post, get on Pinterest and search for DIY card catalog (because that is what I did) and a crazy amount of ideas will pop up. So take note, this is not my genius idea. I’m just copying and tweaking to make it my own. So here is how I copied.
Items needed:
(This post contains affiliate links for your convenience. You can see my disclosure policy here)
- Random cabinet from your barn (ha!). If you don’t have anything of the sort cheap kitchen cabinets work as well. Or head to the thrift store. All you need to worry about is that the doors are flat.
- Random pieces of wood from your barn as well for the top piece. This part is optional. If you like this look and do not have random pieces of wood lying around you can use anything. Deck posts, extra wood flooring, etc
- 1X6
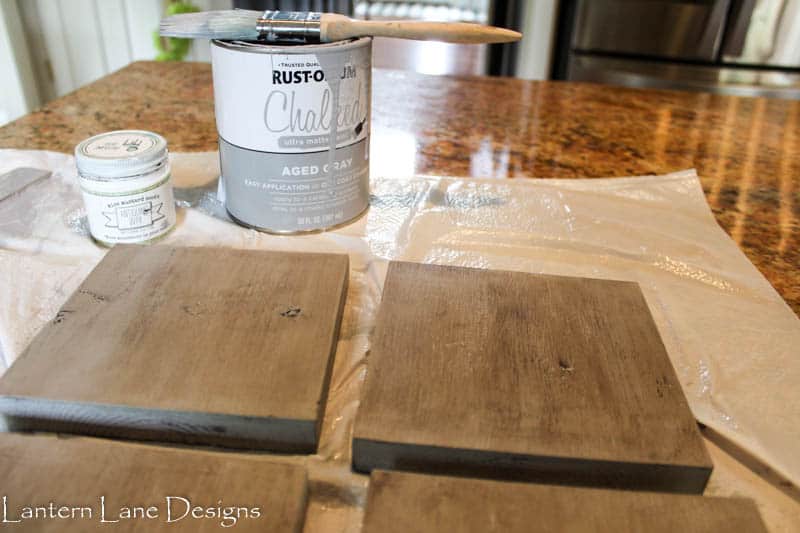
- Chalk Paint of your choice. I used Rustoleum Chalk Paint in Aged Gray
- Dark wax (optional)
- White wax (also optional)
- A few 2.5 inch screws
- Card Catalog hardware
- Wood glue
I first removed the knobs from the original cabinet and patched up those holes and painted the cabinet with Rustoleum Chalk Paint in Aged Gray and applied my dark wax after the paint had dried. It wasn’t until I had this bench almost done that I realized I wasn’t loving the dark wax and applied a white wax over it to lighten it back up. I never make things simple.
I did the same method to my “faux” catalog drawers. To make the “drawers” I cut 8 even squares from my 1×6 and painted those gray and applied a wax as well.
Once my cabinet and squares were dry I glued the squares onto the cabinet with some good old wood glue.
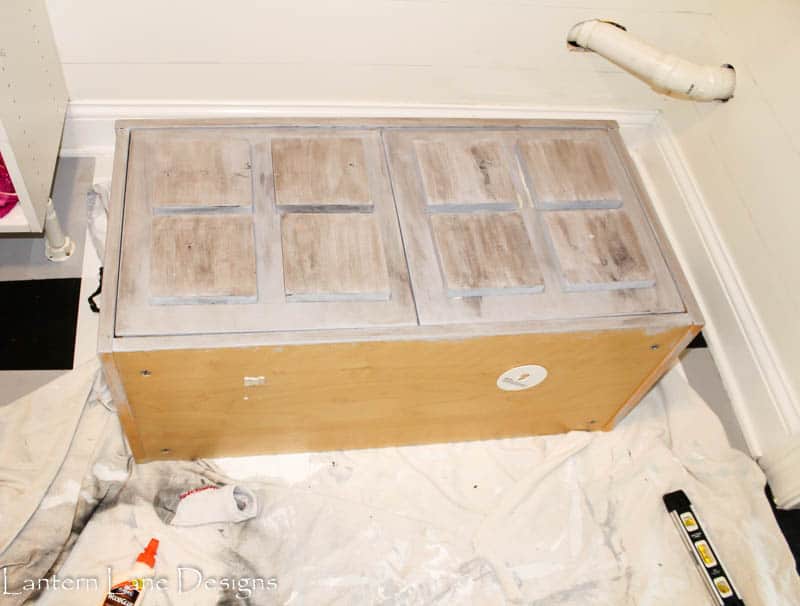
(PS, I have no idea how one of my son’s sock worked it’s way into this scene. Boys…)
Let this concoction dry completely before you pick your cabinet up because if you don’t your faux drawers will be sliding down the cabinet (ask me how I know that). You can also attach the card catalog hardware to your faux drawers at this point (I waited since I didn’t have mine yet.)
I then placed my deck boards directly on top of my cabinet and from inside drilled screws up into the boards so they’d stay put.

Again-it’s magic that these boards were a perfect fit. I did have to trim off a few inches from each board to fit in the space but it wasn’t anything my saw couldn’t handle.
Like I said before I did play around with the dark and white wax. I felt like the dark was looking too streaky for me. I wasn’t using a wax brush and that could have been why. I did end up buying a brush from Walmart and the white wax did go on smoother.
I added the card catalog hardware once Mr. USPS delivered them and stained a piece of paper with tea to make the labels (which they all ended up falling out…except for one…I’ll give you three quarters if you can find it). This part is totally optional and probably a waste of time if I am being honest.
And you’re done. It was so easy and fun to do and if you get around to looking on Pinterest there are ton of other ideas!

Now I have a place to hide shoes that are always just thrown into the mudroom and the kids have a place to sit and put their shoes on.
If you want to save this for later you can pin it here:
Follow me on FaceBook and Instagram! Come Pin with me on Pinterest!
[mailerlite_form form_id=4]
You might also like!


Wow! Looks amazing! Love our idea of adding the blocks for detail. You are so creative!
Thank you!
Love how this turned out! Looks great with the floor 🙂
Thank you!
I love card catalogues! I can’t wait to have a home with more room so I can actually have one! I love what you did with this one – so smart and practical!
xx
Neelam
Thank you! It was a fun project to do!