Affordable dining room decorating ideas and how to decorate your dining room step by step
[mailerlite_form form_id=8]
The holidays are approaching…well depending on when are you reading this. It’s time to get your dining room ready for these entertaining months ahead of you….says the girl that never hosts Thanksgiving or Christmas. Ha!
I’ve been struggling for two years with my dining room. It never felt right to me. It always felt like it was missing something. But after almost two years I have it to a point where (dare I say it) I might just love it. I might actually keep this room looking like this for longer than 2 weeks.
And if someone who LOVES decorating and who analyzes every single room decorated by a real interior designer and who has read mountains of interior design books is having a problem getting a room to look put together, I can only imagine what it would be like for someone who can care less about decorating to try to put a room together.
So instead of me just showing you pics of my dining room, we’ll break it down and I will go through my design process step by step. I’ll also throw in some tips for extra fun.
And if you know me well, you should know this room was decorated on the “cheap”. My deal seeking ninja skills were on overdrive with this room.
Decorating this house has been fun and challenging at the same time. It’s more of a traditional home and I wanted to keep that design style throughout this house…and with an added touch of modern. Coming from our previous home that had more of a farmhouse feel, I had to train my mind to decorate differently than what I have been used to.
It’s been challenging but I love how it’s coming together. I find myself becoming more of a minimalist with my decorating too. My stuff hoarding days are slowly coming to an end.
And again, I am not a professional interior designer…just someone who loves decorating so take what I am about to tell you with a grain of salt. If you need a budget to help you along too I have one for you.
Let’s back up first. This is what our dining room looked liked shortly after we moved into this house, crooked candlesticks and all. The walls were yellow, the chandelier wasn’t my style and this room was so much bigger than our previous dining room. It did not feel cozy to me. It just felt blah.

We purchased our dining room furniture years ago, well before I knew better than to buy all matching furniture. If I could do things over, I would have purchased different chairs. But that’s water under the bridge at this point. New chairs are not in the budget for us right now.
However, if you are looking at dining room furniture, please just know that you do NOT have to buy the set. Mix it up, it will add so much more interest to your space.
Alright, ready to be one of the squirrels running around in my head…
(This post contains affiliate links. You can see my disclosure here)
Step 1: Paint
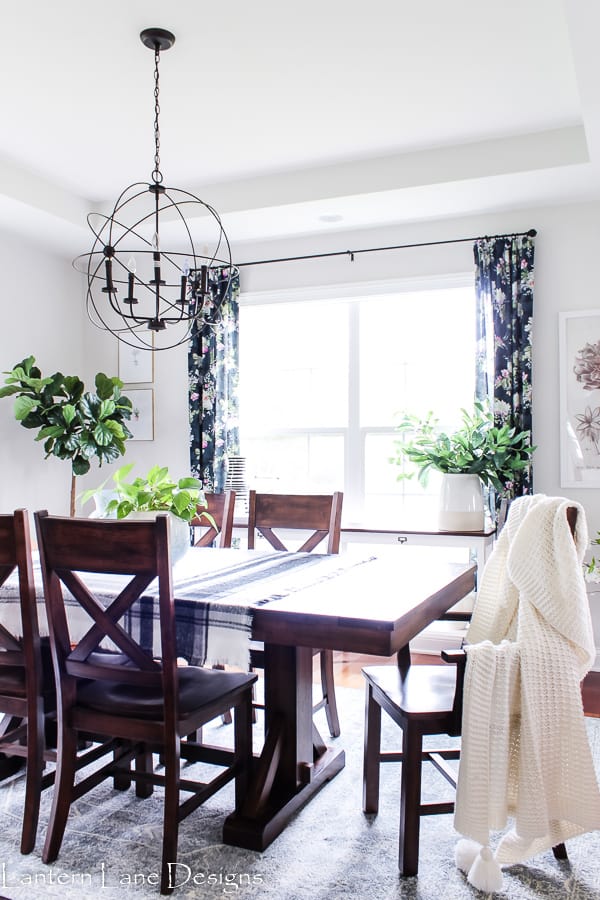
I know, I know, in my how to begin decorating post, I told you to not start a room design with painting first. But I knew I wanted to go neutral in here and I knew exactly what paint color I wanted to use. So, I immediately painted the dining room and the whole first floor Silver Drop by Behr which, in my opinion, is the perfect neutral color to paint any room.
Step 2: Add Window Treatments
While painting helped, I was far from where I wanted to be. Window treatments always magically bring a room together. I started out with white IKEA curtains. They softened up the windows and I usually am pretty content with white curtains in any room.

But…
Since our dining room is so big, I thought that darker and bolder curtains would be a fun change. And it’s the dining room. To me, dining rooms are rooms that you can play around with color a bit. So I made easy DIY no sew curtains with fabric that I found at Hobby Lobby

Tip: Hang those curtains high and wide. I like to hang my curtain rods to be evenly spaced between the ceiling and the window, sometimes I go higher if I feel the need. This will draw your eyes up and make your windows and room look bigger. Unless you have extra short ceilings, 84″ curtains are never long enough. I never understood why 84″ is the standard curtain length. I can’t tell you the last time I purchased 84″ curtains.
**Update** I switched out my curtains….again. Are you surprised? You shouldn’t be. I hung the Sanela curtains from IKEA in emerald green. Never in a million years did I think I would have green velvet drapes hung in my dining room but here I am….and I am not mad about it.

Step 3: Change Out Your Lighting
The new curtains helped a ton, more than I thought they would. The lighter walls and darker curtains is a combo I can get on board with.
The room was beginning to feel a little bit cozier to me. I knew it was time to change out the chandelier. I was putting it off for a while since I am so indecisive and cheap. I didn’t want to spend a ton of money and I needed a larger chandelier for our space. I finally settled on this orb chandelier. The price and size were perfect for the space. I love pairing navy and black together. The navy curtains and black chandelier play nice with each other.
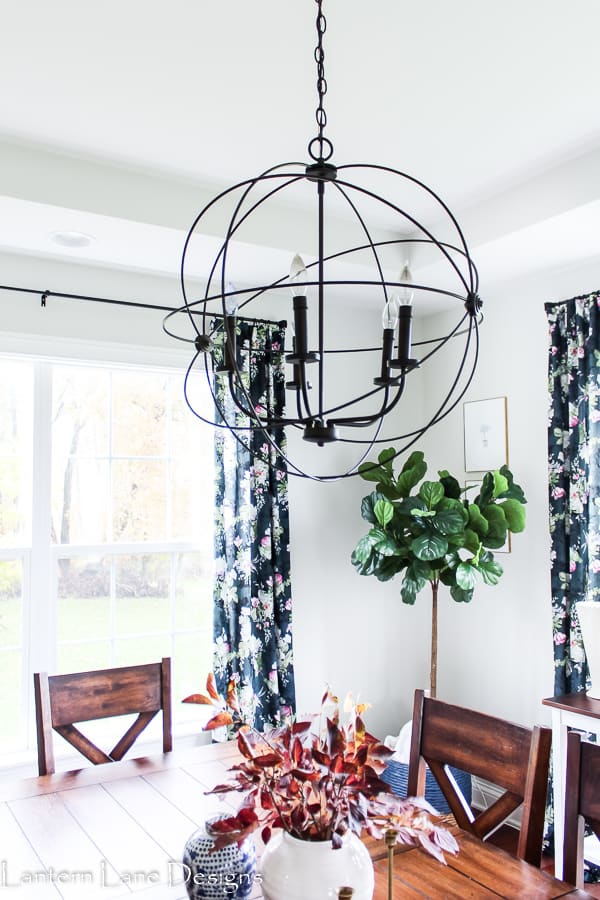
Tip: I touched on this in my affordable chandeliers from Amazon post but here it is again. Measure the width of the table. You want your chandelier to be 1/2 to 2/3 the width of your table (not length). You also want to make sure the chandelier is 12″ less than the width of the table so it’s not too big.
Once you get your chandelier you will want to hang it 30″-34″ above the table if you have 8′ ceilings. You can add an additional 3″ for each additional foot of ceiling.
Step 4: Add An Area Rug
I needed a rug, I know I did. I was holding off on that too for the same reasons I said about our chandelier.
Finding the perfect rug is hard. I struggled last year looking for an entry rug. I feared this rug search would put me over the edge like the last one did.
I had a dark dining set and dark floors and dark drapes. I wanted to go light with the rug. Remember in my how to decorate post I said to pull a color from your drapes if you need to find a color palette. Well that’s what I did.
After some searching on my usual spots (Wayfair, Joss and Main etc) I found the perfect rug on Amazon. It really is such a pretty rug and the price was great. But the color of the rug is what I was really focusing on. I chose the slate/ivory color combo.
I had to eyeball it and keep my fingers crossed that the pictures online of the rug were true. It worked out perfectly. The slate gray flowers in the drapes matches almost perfectly slate gray color of the rug.
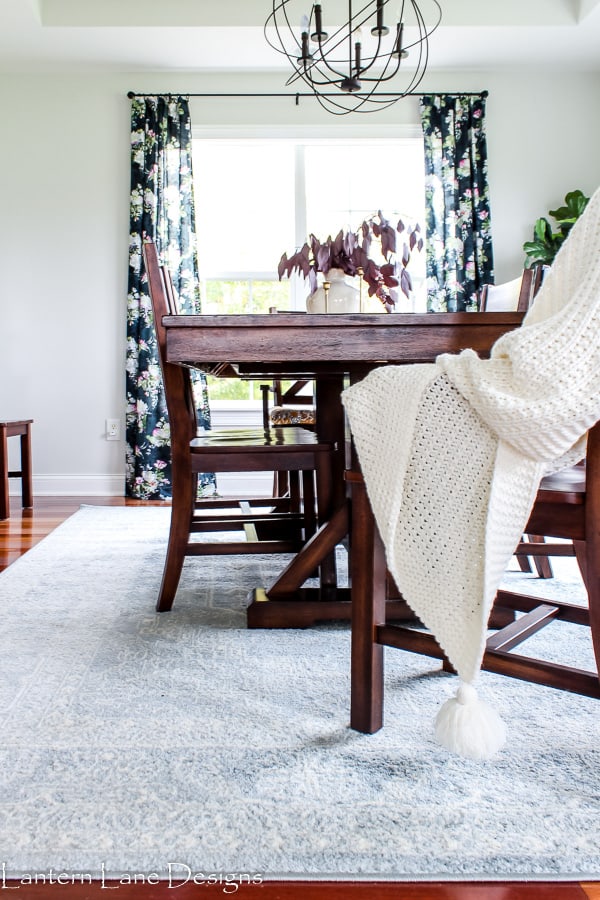
Tip: Go big!!! I am guilty of this too. I know there is such a difference in price between a 5×7 rug and an 8×10 rug. Get the 8×10. Spend the extra money and do it. And these days, there are so many affordable rugs. You want to make sure that when all chairs are pulled out the legs of the chairs are still on the rug.
Step 5: Add Accessories
Once the big pieces were in, the last step was adding in some accessories. Guys, this was so hard for me. I’m not going to lie. I’ve been, what I like to call, overdecorating my spaces for as long as I can remember. I just love stuff…especially in the forms of vases, pillows and pretty decorative things.
I will have one grand garage sale one day to unload all of this stuff I have been hoarding. But I needed to turn a corner in this room. Part of the problem was that the stuff that I didn’t love ended up in the dining room and therefore was making me not love my dining room.
Guess what I did?? I took every accessory out of my room. Every surface was bare. I slowly started adding in pieces that I loved. Some stuff I had already and some stuff I purchased.
Let’s start with the console table that I stole from my parents. I was using it as a hutch and I had random vases and serving bowls stored on it. It just felt cluttered to me. After I had it all cleared off, I added in some large vases and two big baskets and was done. And I love it. It’s decorated but not overdecorated.

Fiddle Leaf Fig Tree//Baskets//Large Stoneware Vase
And this little hutch over here…dear lordy it did me in. I’m not joking…one of my closet friends received about 325,658 text messages from me with 325,658 different design ideas for this little table. It used to look like this…

It was fine, actually, the old Jenna didn’t mind it. I was getting bored with it though and the navy lampshades on those table lamps were fading. The whole set up was looking a bit tired. So after 325,658 attempts to redecorate this little table I finally ended with this

Mirror//(Similar mirror if you need larger)//Lamp (Similar)//Vase (smaller version)//Beads
The reflection of my camera in the mirror cracks me up. I got photobombed by my own camera.
Here’s my tip for accessorizing, get on Pinterest or pull out those Pottery Barn magazines you get in the mail and just analyze them. I have about 100 pictures saved on my phone of pretty decorated console tables. And since I am a stuff hoarder I had all kinds of vases and things to work with.
I did purchase a new mirror and lamp to freshen up the area. I love round mirrors and always pictured one above this table. And I went larger with the lamp too.

And you guessed it, I had to do this same Pinterest stalking technique for my centerpiece on my dining table. Since I had a few statement pieces on both console tables, I went simple with the centerpiece. I clipped a few branches off of our lilac bush while waiting for my youngest to get off the bus.

I love how it FINALLY came together. Two years of walking in here and not feeling it and now it just seems like this is how it was meant to be. Maybe now, I’ll offer to host Thanksgiving…ha-just kidding…
Here it is now, with the new drapes and new decor.

If you want to save this for later you can pin it here:
Follow me on Facebook and Instagram! Come Pin with me on Pinterest
You might also like!
Affordable Chandeliers On Amazon
