[mailerlite_form form_id=8]
Welp, another wall gets some board and batten love. I really do love this stuff. It’s pretty easy to do and adds so much character to an otherwise boring wall. Our master is in need of a little makeover but I have been putting off even thinking about it as long as I can mainly because I am so indecisive. I haven’t really touched this room since we moved in. I really have no idea what to call the color it was painted by the previous owner. Peach maybe? It looked like Barbie’s skin color. So whatever color that is. I knew I needed to pick a paint color and I knew I wanted to do something on the back wall where the bed is (among other things that still aren’t done). I thought I had some time to let ideas float around my brain until the perfect one landed. But then on a whim we decided to get a new bed and headboard. We got the old bed out of our room and I knew I had to get the room painted before we put a bigger bed in here. I had 48 hours until the new bed was to be delivered. I had no time to be indecisive so I grabbed my old faithful paint color and went with the easiest and quickest board and batten I could think to do. Since I just did another board and batten project in our entry I wanted to make sure this project looked somewhat different. I also tackled this project a little differently. The main difference being the wood I used. This time I went with primed lattice moulding. Not only was this primed already it was so light and easy to use. Lighter and easier than my entry lattice I used. I purchased mine from Lowes and I know my other best friend, Home Depot, carries this moulding too.
Items needed:
(This post contains affiliate links)
- Trim of your choice (but you should take my advice and use what I used)
- Paint of your choice
- Paint brush and foam roller
- Nail gun or hammer and nails
- Box miter saw
- Spackle or caulk
First thing first, paint your wall. I wanted the board and batten to be the same color as the rest of the walls in my room so I painted my wall Silver Drop by Behr. Since this was going to be floor to ceiling board and batten I made sure to paint my batten that was running horizontal against the ceiling before I got it up there to make things easier for me. (Side note, I was doing this project at night so excuse the fuzzy pictures)

Once you have your ceiling trim up on your wall you can start adding the vertical battens. This is when you need to break out your calculator but let’s be honest-I didn’t. I kind of eyeballed it. If you are brave, there is a formula if you look hard on Pinterest that helps you calculate the exact distance between each board. I remember attempting to use one the very first time I ever tried this project years ago but it was painful and eyeballing it is just so much easier. I didn’t want to space them out too far apart or too close together. I estimated about 12-14 inches apart would work. I did use my nail gun for this project but a hammer and nails work too. I love my nail gun though, like really love it.

If you have 8 foot ceilings this project works great since your battens are 8ft long. You’ll still need to trim your battens a few inches. A few helpful tips that should make this easier for you. Not all ceilings are level so you can’t cut all the boards the same size and expect them to fit perfectly in every spot. But you can use one board as your template so you don’t need to measure 16 times. I would put my template batten up on the wall to make sure it fit where I wanted a batten to go and then used it to cut my other battens that would actually get nailed up on the wall. Clear as mud?

If the template batten was too long or too short in the space I wanted a batten to go I would have to measure that spot but that only happened a few times. I just used my miter box saw for this project. This wood was so thin it took 5 seconds (ok maybe 10) to cut by hand and I was doing this project late at night so I had no desire walking to my barn 16 different times to cut each batten. I have a clear piece of plastic I was using to cut my wood on to protect my carpet from the saw.

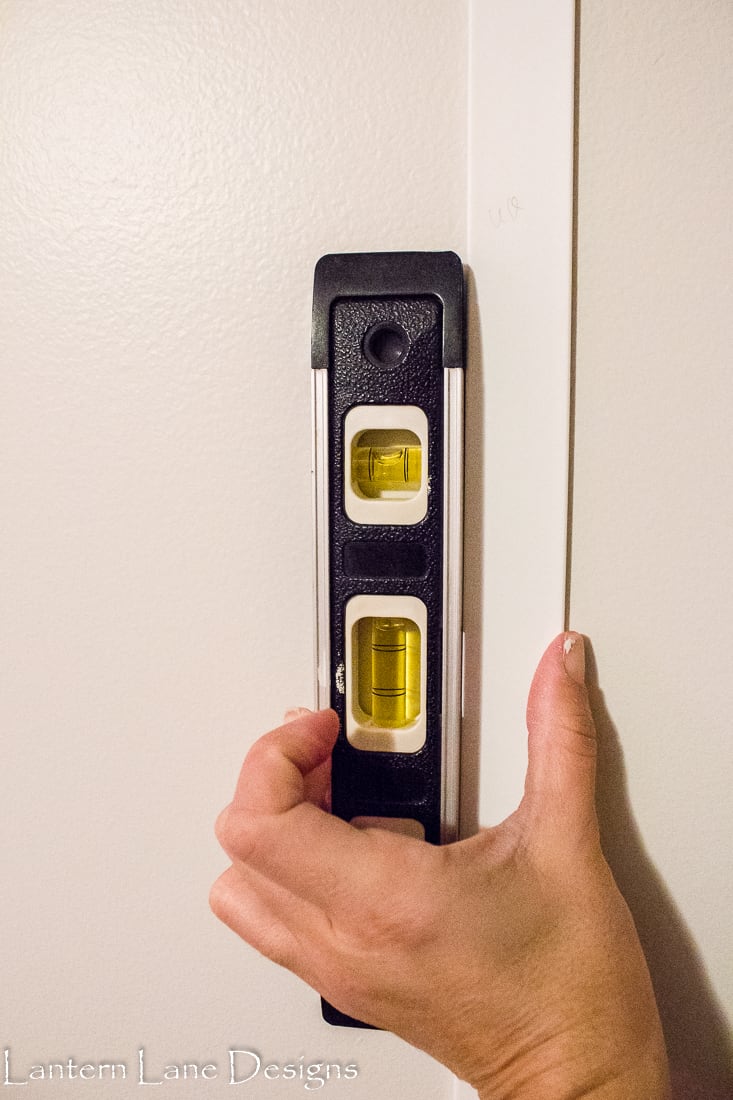
Make sure each batten is level before nailing it to your wall.
I also cut a 12 inch strip of batten to use as my guide to space each batten on the wall.

After I got all the vertical battens up on the wall it was time to fill those nails holes and ideally fill any gaps between the batten and the wall…(which secretly I didn’t.) I filled all my nail holes with wood filler and ran out of time and determination to do the gaps. This wood is so thin that I was able to get the battens pretty flush on the wall so it isn’t too noticeable that I skipped this step. When filling in your nail holes, the tiniest bit of wood filler is all you need. Go light with it and you will not have to sand your holes afterwards. If you put too much wood filler in the hole you will need to sand some so your batten is nice and smooth. I gave my battens a quick coat of paint after the wood filler dried. This is where a small foam roller will help you greatly on your batten pieces.
I really do love how just a few pieces of wood nailed to a wall can make such a huge difference. I’m glad I had to rush myself and didn’t have time to overthink this project. Our master is far from done. But I got the part I was dreading done. Now to find bedding and get my husband on board with switching out the Golden Girls ceiling fan we have rocking but for now I will leave you with a teaser…
And if you want to save this for later, you can pin it here:

Come hang out with me on Facebook and Instagram and pin with me on Pinterest
[mailerlite_form form_id=4]
You might also like!


How to hang beadboard wallpaper (horizontally!)

Have you tried the batten on a ceiling especially to cover up a long crack that keeps appearing.
Hi Sandra,
I have not but I have seen people use beadboard on their ceilings to hide any imperfections. I can’t see why a batten wouldn’t work. Good luck!